Hi all,
The goal of this post is to describe all the steps leading to a successfull FTP Server Installation with the following features :
- FTP Server compatible with Debian 7 or CentOS 7 (might also be available for lower versions)
- FTP Mysql user and group accounts
- Web management interface (WebUI) for user, group, config, log management
I need to define a dedicated directory for all my customers, so that they can upload their files over my platefrom.
I need an "admin" user that has access to the root directory and can browse the other directories.
I need every users to be able to upload their files in their own directory ie. users must be chrooted.
I need to be able to create users and groups under Mysql with the Web management interface.
I need to be able to consult logs over the Web management interface.
I need a protected Web management interface.
I will try to detail all the steps leading to a successfull and peaceful install.
Feel free to add your tips, wishes and participate in the elaboration of this FTP Server host.
Replies (8)
Webmin install
Reply 1Install required software - CentOS 7
Reply 2#Install MySQL :
yum -y install mariadb-server mariadb
#Starts the service
systemctl start mariadb.service
#Enable service startup at boot
systemctl enable mariadb.service
#Set the password for you MySQL / MariaDB install :
mysql_secure_installation
#Install Apache :
yum -y install httpd
#Start the Apace service
systemctl start httpd.service
#Enable the Apache service at boot
systemctl enable httpd.service
#Firewall Management
#Add HTTP port 80 port to firewall
firewall-cmd --permanent --zone=public --add-service=http
#Add HTTPS 443 port to firewall
firewall-cmd --permanent --zone=public --add-service=https
#Add Mysql 3306 port to firewall - In case you are behind a NAT only - Not mandatory !!!
#firewall-cmd --permanent --zone=public --add-port=3306/tcp
#Add FTP Service on ports 20 and 21 to firewall rule
firewall-cmd --permanent --zone=public --add-service=ftp
#Add Webmin port 10000 to firewall
firewall-cmd --permanent --zone=public --add-port=10000/tcp
#Reloads firewall config
firewall-cmd --reload
Install required software - Debian 7
Reply 3#Install Mysql, PHP5, Apache, phpMyAdmin :
apt-get -y install apache2 php5 mysql-server libapache2-mod-php5 php5-mysql phpmyadmin php-pear
#Enable PHP5 mod for Apache :
a2enmod php5
#MySQL configuration
mysql_secure_installation
#Firewall Management
#Add HTTP port 80 port to firewall
iptables -A INPUT -i eth0 -p tcp --destination-port 80 -j ACCEPT
#Add HTTPS 443 port to firewall
iptables -A INPUT -i eth0 -p tcp --destination-port 443 -j ACCEPT
#Add Mysql 3306 port to firewall - In case you are behind a NAT only - Not mandatory !!!
iptables -A INPUT -i eth0 -p tcp --destination-port 3306 -j ACCEPT
#Add Webmin port 10000 to firewall
iptables -A INPUT -i eth0 -p tcp --destination-port 10000 -j ACCEPT
#Saves firewall config
iptables-save
Thanks for sharing :)
Reply 4Thanks very much for sharing Julien! :) Sorry TurnKey couldn't give you what you needed OOTB this time, we really appreciate you sharing your work. We may even use it to create a new FTP server appliance in the future?! :)
Configure Mysql to allow phpMyAdmin from your Web Front End
Reply 5This part is not mandatory and you must do it if and only if know what you are doing.
Goal : allow phpMyAdmin to access the MySQL database of your FTP Server from your Web Server.
In this situation, you have 3 hosts :
- 192.168.1.2 => webserver (port 80) - Linux
- 192.168.1.3 => your NAS (Synology, Thecus or anything with mass redundant storage and NFS protocol embedded) - Linux
- 192.168.1.4 => ftpserver (port 20 and 21) - Linux
Because you only need to manage the database of your ftpserver, you don't need a new phpMyAdmin install.
Here is how you can do this.
On your webserver :
#Edit your the know hosts file
vi /etc/hosts
#Record your /etc/hosts file when it looks like this :
127.0.0.1   webserver localhost localhost.localdomain localhost4 localhost4.localdomain4
::1         webserver localhost localhost.localdomain localhost6 localhost6.localdomain6
192.168.1.3     nas
192.168.1.4     ftpserver
In most cases, phpMyadmin is installed on "/var/www/html/pma" or "/var/www/html/phpmyadmin/".
#Edit the config of your webserver :
vi /var/www/html/phpmyadmin/config.inc.php
#Find the section that begings with the Authentication type and add yours with cookie auth :
/* Second Server */

$i++;
/* Authentication type */
$cfg['Servers'][$i]['auth_type'] = 'cookie';
/* Server parameters */
$cfg['Servers'][$i]['host'] = 'ftpserver';//use the name of the ftpserver defined in /etc/hosts
//$cfg['Servers'][$i]['user'] = '';
//$cfg['Servers'][$i]['password'] = '';
$cfg['Servers'][$i]['connect_type'] = 'tcp';
$cfg['Servers'][$i]['compress'] = false;
/* Select mysql if your server does not have mysqli */
$cfg['Servers'][$i]['extension'] = 'mysqli';
$cfg['Servers'][$i]['AllowNoPassword'] = false;
Once you've defined that, you need to allow MySQL to be managed from a remote host.
#On your ftpserver, launch MySQL and execute the following commands :
#From ftpserver shell :
mysql -u root -p
[type in your root password]
USE mysql;
#Show the current user list :
SELECT Host, User, Password FROM user;
#Create a root (or other admin) user with all Hosts (%), then check it's working
CREATE USER 'root'@'%' IDENTIFIED BY 'MySecurePassword';
#Apply the privileges to the new root@% user :
GRANT ALL PRIVILEGES ON *.* TO 'root'@'%' WITH GRANT OPTION;
FLUSH PRIVILEGES;
#Check the user list :
SELECT Host, User, Password FROM user;
exit;
Now, you should be able to :
- see your ftpserver host in the list of servers available through your phpMyAdmin hosted on webserver.
- access your ftpserver MySQL database through it
Add extra repository in CentOS7 : EPEL
Reply 6Source : http://www.cyberciti.biz/faq/installing-rhel-epel-repo-on-centos-redhat-...
Goal : ease the install of commonly used software such as "htop" (and many others) when playing with yum
EPEL stands for : Extra Packages for Entreprise Linux
#Just tell yum he can use the EPEL repository.
yum install epel-release
Installation of the FTP Server
Reply 7Goal : chose and install the FTP server
- FTP Server compatible with Debian 7 or CentOS 7 (might also be available for lower versions)
- FTP Mysql user and group accounts
- Web management interface (WebUI) for user, group, config, log management
I need to define a dedicated directory for all my customers, so that they can upload their files over my platefrom.
I need an "admin" user that has access to the root directory and can browse the other directories.
I need every users to be able to upload their files in their own directory ie. users must be chrooted.
I need to be able to create users and groups under Mysql with the Web management interface.
I need to be able to consult logs over the Web management interface.
I need a protected Web management interface.
I need to be able to activate / deactivate any user.
I need to be able to add some notes to each FTP account (email, company, telephone).
My choice went to pure-ftpd beause it's robust, and more easily configurable thatn proftpd.
Also the pure-ftpd web interfaces are more up to date that proftpd.
#Install pureftpd server from : http://www.pureftpd.org/project/pure-ftpd/download
yum -y install mysql-devel
wget ftp://ftp.pureftpd.org/pub/pure-ftpd/releases/pure-ftpd-1.0.39.tar.gz
tar -xzvf pure-ftpd-1.0.39.tar.gz
cd pure-ftpd-1.0.39/
./configure --with-mysql --with-virtualchroot --with-quotas --with-welcomemsg --with-ftpwho
make install-strip
Et voila! The software is now installed in /usr/local/sbin/pure-ftpd
#Add FTP Group and FTP User :
Source : https://pure-ftpd-webui.org/wiki/Pure-FTPd%2BMySQL%20installation#CentOS
groupadd -g 2001 ftpgroup
useradd -u 2001 -s /bin/false -d /bin/null -c "pureftpd user" -g ftpgroup ftpuser
cd /etc/
mkdir pure-ftpd
#Create the MySQL Database and its user access :
mysql -u root -p
SHOW DATABASES;
CREATE DATABASE IF NOT EXISTS pureftpd;
-- CHANGE PASSWORD !!!
CREATE USER 'pureftpd'@'localhost' IDENTIFIED BY 'pureftpdpass';
GRANT ALL PRIVILEGES ON pureftpd.* TO 'pureftpd'@'localhost';
FLUSH PRIVILEGES;
SHOW DATABASES;
quit;
#Install the PureFTPD WebUI
Source : https://github.com/mazay/pure-ftpd-webui ZIP : https://github.com/mazay/pure-ftpd-webui/archive/master.zip
wget https://github.com/mazay/pure-ftpd-webui/archive/master.zip
mv master.zip pure-ftpd-webui.zip
unzip pure-ftpd-webui.zip
cd pure-ftpd-webui-master
cd INSTALL
mysql -u root -p pureftpd < pure-ftpd-webui_users-table_0.0.9.sql
mysql -u root -p pureftpd < pure-ftpd-webui_users-table_0.1.1.sql
#Add the main pure-ftpd configuration file :
echo "
############################################################
#                                                          #
#         Configuration file for pure-ftpd wrappers        #
#                                                          #
############################################################

ChrootEveryone              yes
BrokenClientsCompatibility  no
MaxClientsNumber            50
Daemonize                   yes
MaxClientsPerIP             8
VerboseLog                  yes
DisplayDotFiles             no
AnonymousOnly               no
NoAnonymous                 yes
SyslogFacility              ftp
FortunesFile              /etc/pure-ftpd/cookie
DontResolve                 yes
MaxIdleTime                 15
# LDAPConfigFile                /etc/pureftpd-ldap.conf
MySQLConfigFile               /etc/pure-ftpd/mysql.conf
# PGSQLConfigFile               /etc/pureftpd-pgsql.conf
# PureDB                        /etc/pureftpd.pdb
# ExtAuth                       /var/run/ftpd.sock
# PAMAuthentication             yes
# UnixAuthentication            yes
LimitRecursion              10000 8
AnonymousCanCreateDirs      no
# MaxLoad                     4
# PassivePortRange          30000 50000
# ForcePassiveIP                192.168.0.1
# AnonymousRatio                1 10
# UserRatio                 1 10
AntiWarez                   yes
# Bind                      127.0.0.1,21
# AnonymousBandwidth            8
# UserBandwidth             8
Umask                       133:022
# MinUID                      2001
AllowUserFXP                no
AllowAnonymousFXP           no
ProhibitDotFilesWrite       no
ProhibitDotFilesRead        no
AutoRename                  no
AnonymousCantUpload         no
# TrustedIP                  10.1.1.1
# LogPID                     yes
# AltLog                     clf:/var/log/pureftpd.log
# AltLog                     stats:/var/log/pureftpd.log
# AltLog                     w3c:/var/log/pureftpd.log
NoChmod                     yes
KeepAllFiles                yes
CreateHomeDir               yes
# Quota                       1000:10
PIDFile                     /var/run/pure-ftpd.pid
# CallUploadScript yes
# MaxDiskUsage               99
# NoRename                  yes
CustomerProof              yes
# PerUserLimits            3:20
# NoTruncate               yes
# TLS                      1
IPV4Only                 yes
# IPV6Only                 yes
FileSystemCharset       utf8
ClientCharset           cp1251" > /etc/pure-ftpd/pure-ftpd.conf
#Create the pure-ftpd-mysql.conf file :
echo "
MYSQLSocket      /var/run/mysqld/mysqld.sock
MYSQLServer     localhost
MYSQLPort       3306
MYSQLUser       pureftpd
MYSQLPassword   pureftpdpass  # CHANGE PASSWORD HERE !!!
MYSQLDatabase   pureftpd
#MYSQLCrypt md5, cleartext, crypt() or password() - md5 is VERY RECOMMENDABLE uppon cleartext
MYSQLCrypt      md5
MYSQLGetPW      SELECT Password FROM ftpd WHERE User="\L" AND status="1" AND (ipaccess = "*" OR ipaccess LIKE "\R")
MYSQLGetUID     SELECT Uid FROM ftpd WHERE User="\L" AND status="1" AND (ipaccess = "*" OR ipaccess LIKE "\R")
MYSQLGetGID     SELECT Gid FROM ftpd WHERE User="\L"AND status="1" AND (ipaccess = "*" OR ipaccess LIKE "\R")
MYSQLGetDir     SELECT Dir FROM ftpd WHERE User="\L"AND status="1" AND (ipaccess = "*" OR ipaccess LIKE "\R")
MySQLGetBandwidthUL SELECT ULBandwidth FROM ftpd WHERE User="\L"AND status="1" AND (ipaccess = "*" OR ipaccess LIKE "\R")
MySQLGetBandwidthDL SELECT DLBandwidth FROM ftpd WHERE User="\L"AND status="1" AND (ipaccess = "*" OR ipaccess LIKE "\R")
MySQLGetQTASZ   SELECT QuotaSize FROM ftpd WHERE User="\L"AND status="1" AND (ipaccess = "*" OR ipaccess LIKE "\R")
MySQLGetQTAFS   SELECT QuotaFiles FROM ftpd WHERE User="\L"AND status="1" AND (ipaccess = "*" OR ipaccess LIKE "\R")" > /etc/pure-ftpd/mysql.conf
#Start Apache and MySQL (MariaDB)
systemctl restart mariadb
systemctl restart httpd
#Begin the installation of the WebUI files
Source : https://pure-ftpd-webui.org/wiki/Pure-FTPd%20WebUI%20installation#CentOS:
You have already build FTP table (ftpd) and it's admin user (userlist)
You can watch the tables by sending the SQL command : "SHOW TABLES;" if needed
Now we want to add the main admin user of the Admin Panel :
#Connect to MySQL :
mysql -u root -p
USE pureftpd;
#Insert the new admin user with a strong password :
INSERT INTO userlist (user,pass) VALUES ('admin', MD5('adminpass please change me'));
quit;
#Copy the pureftpd-web-ui files into the right directory and manage security
mv /root/soft/pure-ftpd-webui-master /var/www/html/pure-ftpd-webui
chown ftpuser.ftpgroup -R /var/www/html/pure-ftpd-webui
chmod -R 0755 /var/www/html/pure-ftpd-webui
#Add Apache Alias for pureftpd WebUI
echo "Alias /pure-ftpd-webui /var/www/html/pure-ftpd-webui

<Directory /var/www/html/pure-ftpd-webui>
    Options +FollowSymLinks
    AllowOverride None
    order allow,deny
    allow from all

    AddType application/x-httpd-php .php

    <IfModule mod_php5.c>
        php_flag magic_quotes_gpc On
        php_flag short_open_tag On
        php_flag register_globals On
        php_flag register_argc_argv On
        php_flag track_vars On
        # this setting is necessary for some locales
        php_value mbstring.func_overload 0
        php_value include_path .
    </IfModule>

    DirectoryIndex index.php
</Directory>" > /etc/httpd/conf.d/pure-ftpd-webui.conf
#Disable SELinux
vi /etc/sysconfig/selinux
#Set the line begining by SELINUX to "SELINUX=disabled"
#Save the file
#I recommend you restart your machine :
reboot
#You can also leave the machine running by Disabling temporarly SELinux :
setenforce 0
#Restart Apache
systemctl restart httpd
#Open your web browser to test :
Change the IP to match YOUR configuration... http://192.168.1.4/pure-ftpd-webui/install.php
Configuring Pure-ftpd-webui
Reply 8When you hit the install URL : http://192.168.1.4/pure-ftpd-webui/install.php
#You will need to change the access to the config file :
chmod 777 /var/www/html/pure-ftpd-webui/config.php
#You need to enter the right MySQL and user credentials.
It should look like this :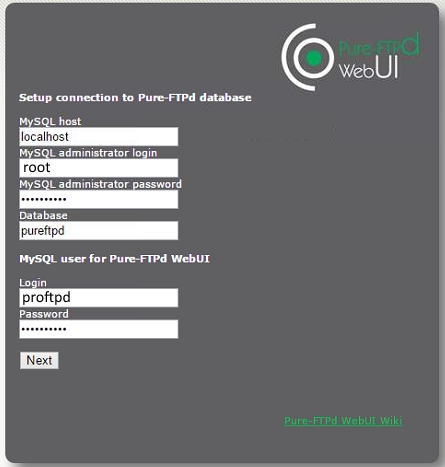
MySQL host : localhost
MySQL admin login : pureftpd
MySQL admin password : USE THE PASSWORD YOU DEFINED for the "pureftpd" MysqL user
MySQL database : pureftpd
Pure-ftpd-webui user : admin
Pure-ftpd-webui password : USE THE PASSWORD YOU DEFINED for the "admin" Pure-ftpd-webui user
Then, click Next button (bottom right)
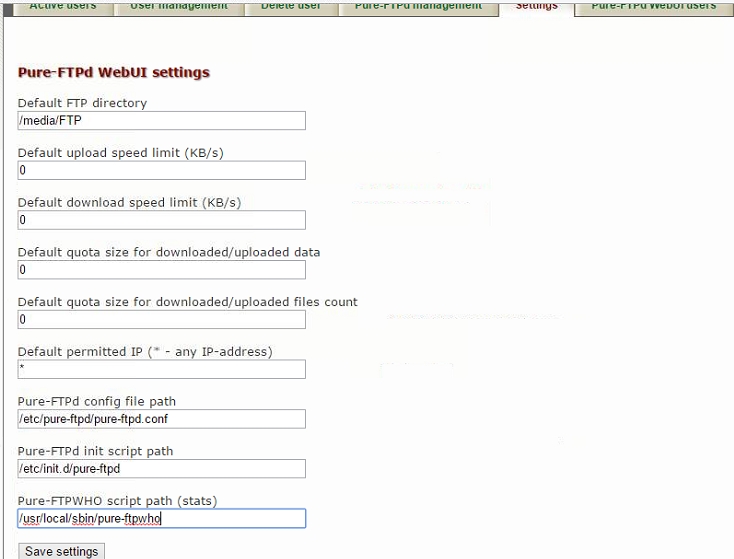
# Add the address of the FTPWHO script to the pureftpd-webui application :
/usr/local/sbin/pure-ftpwho
After a fresh Debian or CentOS install, please execute your system update ("yum -y update" for CentOS7 and "apt-get -y update" for Debian7) :
CentOS 7:
Debian :
You should be able to login to Webmin on "https://localhost:10000"