You are here
Generating a SSH key pair from Windows
Inspired by a doc from Linode - This is a total rewrite to comply with the original work's CC BY-ND 3.0 license.
To connect via SSH from Windows we recommend PuTTY. For general SSH connection you only require the single main PuTTY executable (putty.exe). But to generate a SSH keypair (AKA "SSH keys") you will need PuTTYgen (puttygen.exe). You can download the individual executables or a zip or installer (which includes all the PuTTY tools). Check out the downloads page.
Generating an SSH Keypair with PuTTYgen
The standalone executable (puttygen.exe) can be run directly; otherwise unzip or install the software depending on your download choice from above.
-
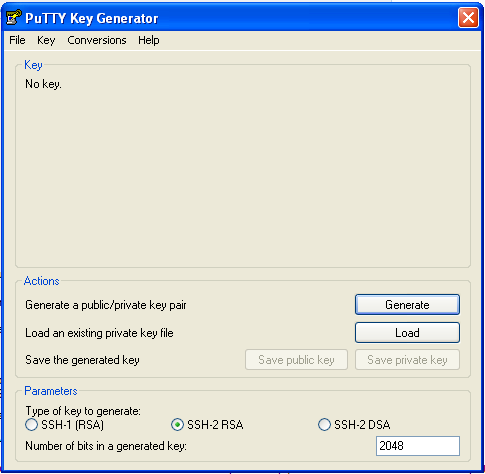
Eventually (or straight away if you launch puttygen.exe) you will find yourself on the key generating screen. The defaults should be fine. Unless you know what you are doing, it is recommend you leave them as they are.
Click the Generate button to start the generation process. This will generate a pair of keys (aka a keypair); one private (which you keep on your computer somewhere safe and never share with anyone!) and one public (which you will upload to your server).
-
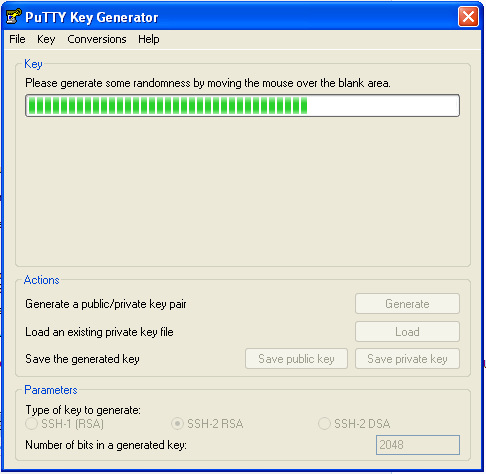
Creation of a unique and truly random keypair requires user interaction. So you need to move your mouse around in the program window until the progress bar is full.
-
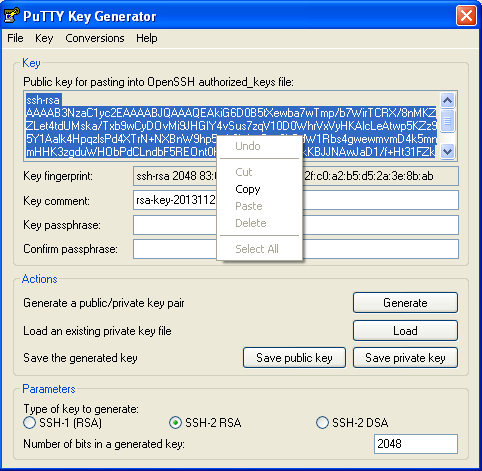
Once generated, the public key will be displayed in the next window. Ensure that you select it all, then right mouse click and select "copy".
-
You will now need to paste your public key somewhere for later use. Into a text file is a good option. Generally it is bad practice to use NotePad or WordPad with Linux files (both of these text editors mangle Linux files and will cause errors). I recommend that you use the free open source NotePad++ (download page). However for simply saving your public key for now, NotePad/WordPad will work. Make sure you remember where you saved it as you'll need it again soon.

-
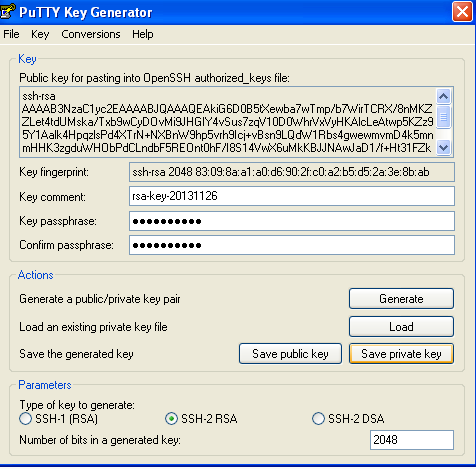
To provide extra security you can also add a passphrase to your private key. This means that even if someone steals your private key they still need to crack your passphrase to access your servers. Generally this is a recommended step, although it is optional.
The passphrase can be any string of letters and numbers and should be unique and unguessable. A full sentence is a good choice as it is difficult to crack, but relatively easy to remember. Ideally commit your passphrase to memory, otherwise make a note of it somewhere safe; you will need it later! And if you disable SSH password login (final section below) if you forget or lose your passphrase you WILL NOT be able to recover it!
If you choose to use a passphrase, enter and confirm it (by entering again in the line below).
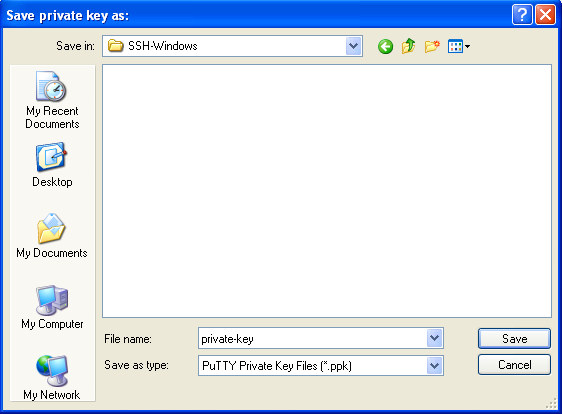
Regardless, click the Save private key button. This will save the private key.
-
The default file location is fine so jsut leave that be unless you have reason. Name the private key file and click on Save.
You can use the same key across multiple servers, but alternatively can have different keys for different servers. If you plan on creating multiple keys make sure you use different names to avoid writing over the key files. Make a note of the name and location of the private key, you'll need that later.
Adding your Public SSH Key to the Hub
If you are using the Hub then you can add your public key there. Then any new servers that you launch will automagically get your public key. Cool huh!?
If you aren't using the Hub, you'll need to skip to the next section.
-
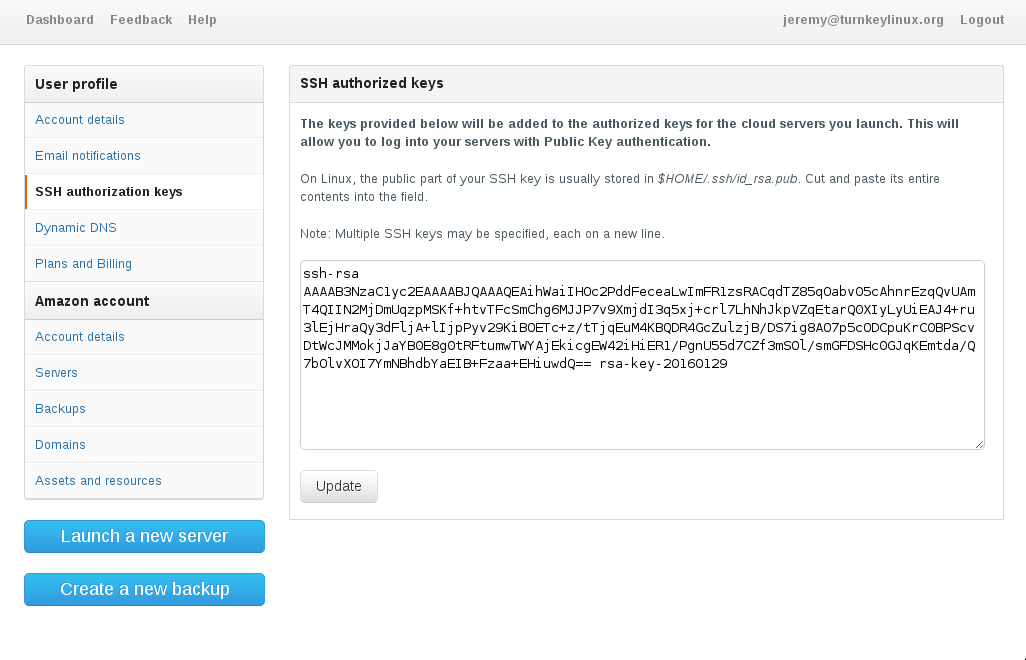
Log into your Hub account and go to the "SSH authorization keys" tab. Paste you public key there (as shown below) and click "Update".

-
Now launch a new server and follow the instructions below to log in with PuTTY using your new key. If you wish to connect to existing Hub servers (not just new ones) then you will also need to complete all of the "Manually Adding your Public SSH Key to your Server" instructions below.
Note: if you are using the AWS MarketPlace then you can also add your public SSH key to a particular region via the AWS Console. All future servers in that region automagically get your key (similar to how the Hub works). If you want to use the same key across multiple regions you'll need to manually add it to each region. Exact steps to do that is beyond the scope of this doc.
Configuring PuTTY to Connect to your Server
So now you need to set up PuTTY (putty.exe) to use your private key.
- Launch PuTTY (putty.exe).
-
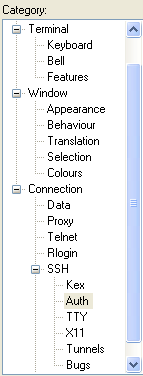
From the left pane, select Connection >> SSH >> Auth. You may need to click the "+" to expand the options.
-
Defaults should be fine, although you will need to set the location of the private key file (from step #6 "Generating an SSH Keypair with PuTTYgen"). Either click on the Browse button and navigate to the private key file, or type the full file path in the box.

-
[Optional] You can set the username that you wish to connect with under Connection >> SSH >> Data. Generally it will be "root" (don't use the quotes) unless you have added an alternate user. If you are using an Amazon MarketPlace instance it will be "admin".
If you don't set this, PuTTY will ask for the username in the SSH session.
-
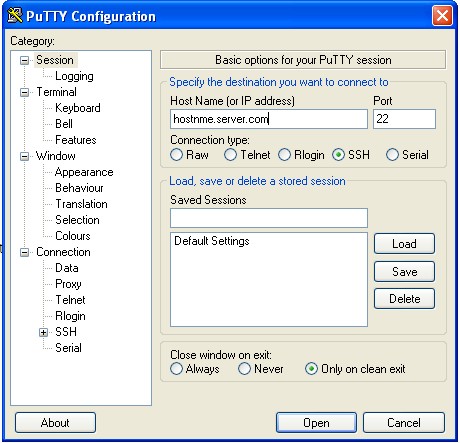
To establish a session, click on Session under the Category list. Enter the FQDN or IP address of your server. Again, all other defaults should be fine.
[Optional] You can save this connection as the default by clicking Save. Or you can save it as one of many possible connections by entering a name in the Saved Sessions text field and clicking Save. Next time you use PuTTY it will auto load the "Default Settings", to load an alternate config, select the name and click Load.
-
To establish a connection, click the Open.
If you saved your public SSH key in the Hub (as per "Adding your Public SSH Key to the Hub" above) and this is a server you have launched since then, then you are good to go. You may need to enter the username (if you skipped step #4 above). If you set a passphrase (step #5 "Generating an SSH Keypair with PuTTYgen" above) you will need to enter that when prompted.
If you are connecting to a non-Hub server; or a Hub server that was created prior to adding your SSH public key to the Hub, then you will need to manually add your key to the server. Follow the instructions in the "Manually Adding your Public SSH Key to your Server" section immediately below to do that.
Manually Adding your Public SSH Key to your Server
Following on directly from the "Configuring PuTTY to Connect to your Server" section immediately above:
-
When you connect to your server you will be prompted to enter your login name (probably "root") and password (the "root" password that you set for the server).
Once you have logged into your server, create an
.sshdirectory (in your home directory), create an emptyauthorized_keysfile inside, and set the access permissions so only your user can read or write to it:mkdir ~/.ssh touch ~/.ssh/authorized_keys chmod -R 700 ~/.ssh
-
Edit the newly-created
authorized_keysfile in your favourite Linux text editor. I'll use nano as an example:nano ~/.ssh/authorized_keys
Paste the contents of the public key from your workstation to the
authorized_keysfile (from step #4 "Generating an SSH Keypair with PuTTYgen" above). Make sure that you save the file on exit.Exit PuTTY.
-
Open PuTTY (putty.exe) again and Load your saved session (from step #4 "Configuring PuTTY to Connect to your Server"). If you didn't save your session, recreate it as per "Configuring PuTTY to Connect to your Server". Again, you may need to enter the username (if you skipped step #4 "Configuring PuTTY to Connect to your Server" above). If you set a passphrase (step #5 "Generating an SSH Keypair with PuTTYgen" above) you will need to enter that when prompted.
You should now be connected to your server using the SSH keypair! :)
If it asked for your password (i.e. not your passphrase) then some thing went wrong adding your public SSH key. Please retry the above steps one more time. If it still fails, please post on our Support Forums
Disabling Password Login [Optional]
As an extra step to securing your appliance, you can now disable password SSH logins.
Important: Only do this if you have successfully logged in with your SSH keypair! If you have not set up your keypair log in correctly (or you lose your private key) you will be locked out of your server and there is no way to recover the password! You have been warned!
-
Log into your server via SSH using PuTTY as detailed above. Make sure that you DID NOT need to use your password. Needing your SSH key passphrase (if you set one) is expected.
-
Open the SSH config file in your favorite text editor, I'll use nano as an example:
nano /etc/ssh/ssh_config
-
Look for the line that says:
# PasswordAuthentication yes
-
Remove the "#" from the start of the line and replace the "yes" with a "no". The line should now look like this:
PasswordAuthentication no
Save the file and exit nano
-
To apply the new config, restart the SSH server:
service ssh restart
-
That's it! The SSH service on your server is now locked down and will only accept the private SSH keys that correspond to the public SSH keys in
~/.ssh/authorized_keys
Comments
also you can generate ssh key